

You've baked a promising loaf, but it has emerged with a domed top, uneven ends and slices that don't sit neatly in a lunchbox. The crust may have spilled over one side of the tin, while the heel pieces are too narrow to use comfortably. A Pullman loaf tin solves that particular frustration by giving the dough a confined, rectangular space and a sliding lid that controls its rise.
UK shoppers face a second problem before they even start baking. Pullman tins are sold by 1lb, 450g, 2lb, 800g and other overlapping labels, while listings also mix external measurements with internal capacity. This guide translates those labels into dough weights, explains how the lid changes the loaf, and shows how to adjust proofing for both soft sandwich bread and sourdough.
Table of Contents
- Why Square Sandwich Loaves Are Trending in UK Kitchens
- What a Pullman Loaf Tin Actually Does
- UK Pullman Loaf Tin Sizes and Dough Weights
- Lid Types and Tin Materials Compared
- Baking in a Pullman Tin Step by Step
- Common Mistakes With Pullman Loaf Tins
- Slicing, Storing, and Caring for Your Tin
- Pullman Loaf Tin Questions Bakers Ask Most
Why Square Sandwich Loaves Are Trending in UK Kitchens
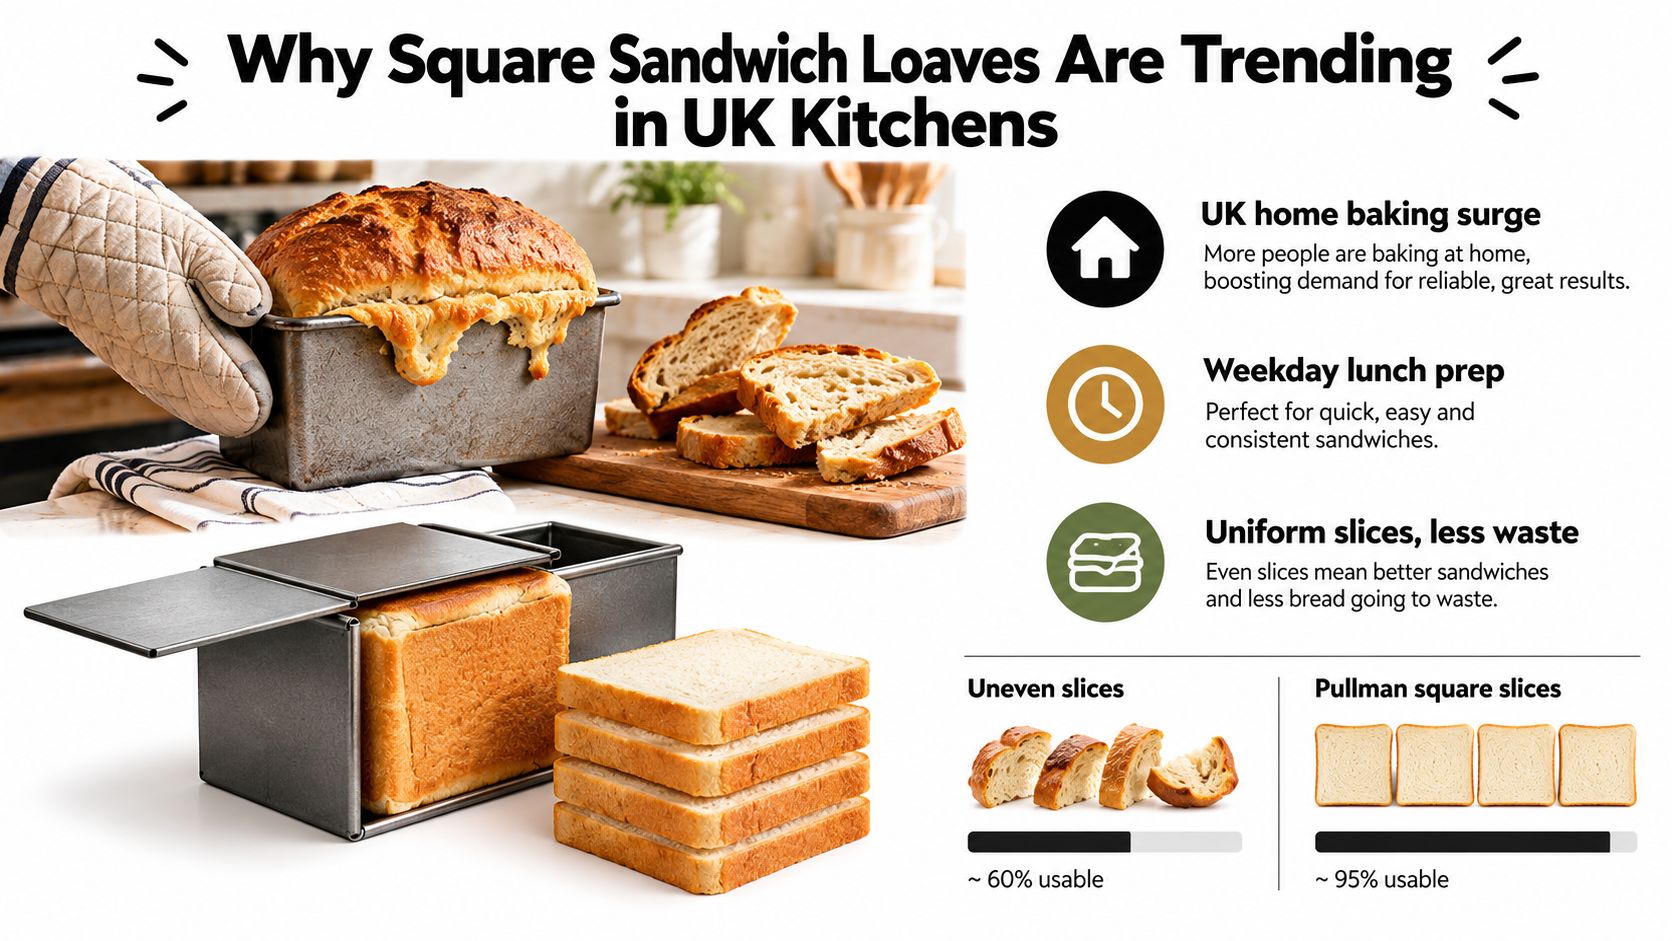
You slice into a home-baked loaf and find a tall crown, uneven ends and shapes that change from one slice to the next. That character can be appealing, but it makes sandwiches harder to stack and pack. A square loaf gives each slice a more predictable working surface.
The Pullman format provides that control. UK listings such as UK Pullman loaf tin listings describe non-stick finishes, sliding lids and heat resistance up to 250°C, positioning these tins as everyday equipment rather than specialist bakery curiosities. For a home baker, the practical benefit is repeatability: a loaf that slices cleanly, stacks neatly and suits familiar sandwich portions.
Why the shape matters at home
Straight sides give a serrated knife a steady guide. A flatter top also makes it easier to spread butter or fillings without the slice tipping, while the confined space encourages a finer, more even crumb. That texture suits thin sandwiches, packed lunches and toast.
The Pullman format is commonly associated with square loaves, soft crusts and fine crumb, and you may also see it described as pain de mie. Those qualities appeal to weekday bakers who want dependable slices, as well as sourdough bakers looking for a more practical shape than a free-standing boule.
Size still matters. A long tin can look impressive online but produce slices that are too large for your usual lunchbox, while a smaller tin may leave a high, crowded loaf. Match the tin to the dough weight and the number of slices you normally use.
Practical rule: Choose the Pullman tin for the loaf you want to eat, not merely for dimensions that look impressive online.
The lid and fermentation schedule then determine whether the dough fills the corners neatly or presses against the cover. Getting those choices right makes the square shape a result of preparation, not luck.
What a Pullman Loaf Tin Actually Does
A Pullman loaf tin is a long, rectangular pan with straight vertical walls and a sliding lid. The base supports the dough from below, the walls prevent it spreading sideways and the lid limits how far it can rise. An open-top tin lets dough form a rounded crown; a Pullman tin encourages it to rise into the available rectangular space instead.
Think of the lid as a ceiling set at the height of the finished loaf. During oven spring, the dough expands until it meets that ceiling. Because the lid holds the top in place, the dough pushes into the corners and produces a flatter top with more defined edges. The result is a loaf that resembles the even geometry of packaged sandwich bread, but with the flavour and texture of a home-baked loaf.
What changes inside the crumb
The lid affects more than the silhouette. It limits large expansion near the top and encourages a tighter, more consistent crumb structure, with fewer oversized holes close to the crust. That makes the bread easier to slice thinly and less likely to collapse when you add butter, cheese or a packed lunch filling.
The tin normally has grooves or rails that support the lid as it slides into place. Some models use a cover that fits over the rim, while others have a flatter removable lid that sits within the top of the pan. Either way, the baker can choose between a fully enclosed bake and an open-top finish.
Pullman and pain de mie
You'll often see “Pullman pan”, “Pullman loaf tin” and “pain de mie tin” used for the same broad design. Pain de mie means a soft crumb bread, and the name reflects the style of loaf the covered pan produces. UK retailers may list both terms because shoppers search for the traditional name as well as the product description.
The lid also changes browning. Keeping it on gives the most controlled shape and a paler top, while removing it later allows the exposed crust to colour. That small timing decision becomes especially useful with enriched doughs, which can need protection from early browning while the centre continues baking.
UK Pullman Loaf Tin Sizes and Dough Weights
A Pullman tin's label can mislead you. UK retailers may combine loaf-weight names, metric dimensions and external measurements, so the number in the product title does not always describe the usable baking space. Check the internal cavity when it is provided, then match the dough weight to that space.
The 450g or 1lb class suits a smaller loaf and a modest household. UK examples include tins around 21 × 12 × 11.7 cm externally, while another domestic listing describes a 1lb tin at about 7.8 × 4.7 × 4.3 inches. Treat those figures as examples of the category, not a universal internal size. Metal thickness, rim shape and lid construction all affect how much dough the tin can hold.
A 2lb family tin is the familiar domestic format. UK baking guidance associates a 2lb tin with approximately 800g to 900g of dough, while a 1lb tin generally suits approximately 400g to 500g. One separate UK jumbo specification lists a model measuring 355 × 120 × 120 mm, with an internal cavity of roughly 225 × 100 × 100 mm, as detailed by this UK jumbo Pullman bread tin specification. The guidance on dough weights comes from UK baking tin guidance.
| Tin size | Internal L × W × H | Dough weight | Approx. slices |
|---|---|---|---|
| 1lb or 450g class | Varies by model, check the listing | 400g to 500g | Depends on loaf length and slicing thickness |
| 2lb family class | About 22.5 × 10 × 10 cm for one listed model | 800g to 900g | Depends on slice thickness |
| Jumbo commercial class | About 22.5 × 10 × 10 cm per the cited jumbo specification | About 2,200g with lid on | Depends on slice thickness |
The 2lb and jumbo figures come from different products and should not be read as describing the same tin. A similar cavity measurement can appear in separate listings, while the recommended dough capacity differs because product design, intended use and specification details are not identical. Use the manufacturer's capacity when one is available.
Filling the pan sensibly
Before final proofing, load enough dough to leave visible headspace. Proof until the dough reaches just below the lid rail. Underfilling gives a short loaf with unused corners, while overfilling can make the lid press into dough that still needs room to expand.
For recipe scaling, weigh the complete original dough and compare it with the target weight for the new tin. Keep the ingredient ratios unchanged, divide the target dough weight by the original recipe weight, then multiply every ingredient by that factor. Check the internal length and width too, especially if you want a particular slice size. A longer loaf can produce more slices without using a deeper pan.
If you ferment dough uncovered in a basket before transferring it, compare the pan with this guide to bread proving baskets in the UK. A basket supports fermentation, while the Pullman tin shapes the final bake, so both need to suit the dough quantity.
Lid Types and Tin Materials Compared
A covered tin changes more than the loaf's appearance. It limits upward expansion, so the lid style affects how square the loaf becomes and how easily you can check its progress. For a closer look at covered pans, see our guide to a bread pan with lid.
A slide-on lid runs along rails and covers the pan from above. It gives the most consistent top height and sharper corners, which suits a classic UK sandwich loaf. The trade-off is limited access during baking. A removable flat lid rests inside or across the rim, so you can lift it away for a quick check. It is easier to handle, though the corners may be slightly softer.
| Feature | Slide-on lid | Removable lid |
|---|---|---|
| Shape control | Strong control over top height and corners | Good control, with easier access |
| Checking the loaf | Requires removing or shifting the lid | Lid lifts away directly |
| Handling | Slides along rails and needs careful removal | Simple to lift and replace |
| Best suited to | A sharply squared sandwich loaf | Bakes where checking and access matter |
The lid style and the metal are separate choices. A slide-on lid may be made from aluminium or steel, while a removable lid can use either material. Check both details in the product specification rather than assuming one determines the other.
| Material | Heat behaviour | Release and care |
|---|---|---|
| Aluminium | Heats quickly and keeps the tin relatively light | Follow the maker's instructions for greasing, washing and any coating |
| Carbon steel | Holds its shape well and resists warping | Coatings can aid release, but hand-wash, dry promptly and protect bare steel from rust |
| Cast iron | Retains heat strongly | Heavy for everyday sandwich baking and needs careful maintenance |
Heavy-gauge aluminium works well for soft sandwich dough when you want a pale, tender crumb. Coated carbon steel can suit doughs containing butter, eggs or milk, which may cling more readily to the sides. Cast iron has useful heat retention, but its weight makes it less convenient for regular home use.
For a traditional covered loaf, pair the shape you want with the lid style that gives enough control. Choose material based on heat response, release and maintenance. Before buying, confirm how the manufacturer expects the tin to be greased, washed and seasoned, and make sure the lid moves freely.
Baking in a Pullman Tin Step by Step
A Pullman loaf rewards preparation more than improvisation. The dough must develop enough strength to expand against the straight walls, and the final proof must stop at the right moment. If either stage is rushed, the lid can turn a small weakness into a dense or uneven loaf.
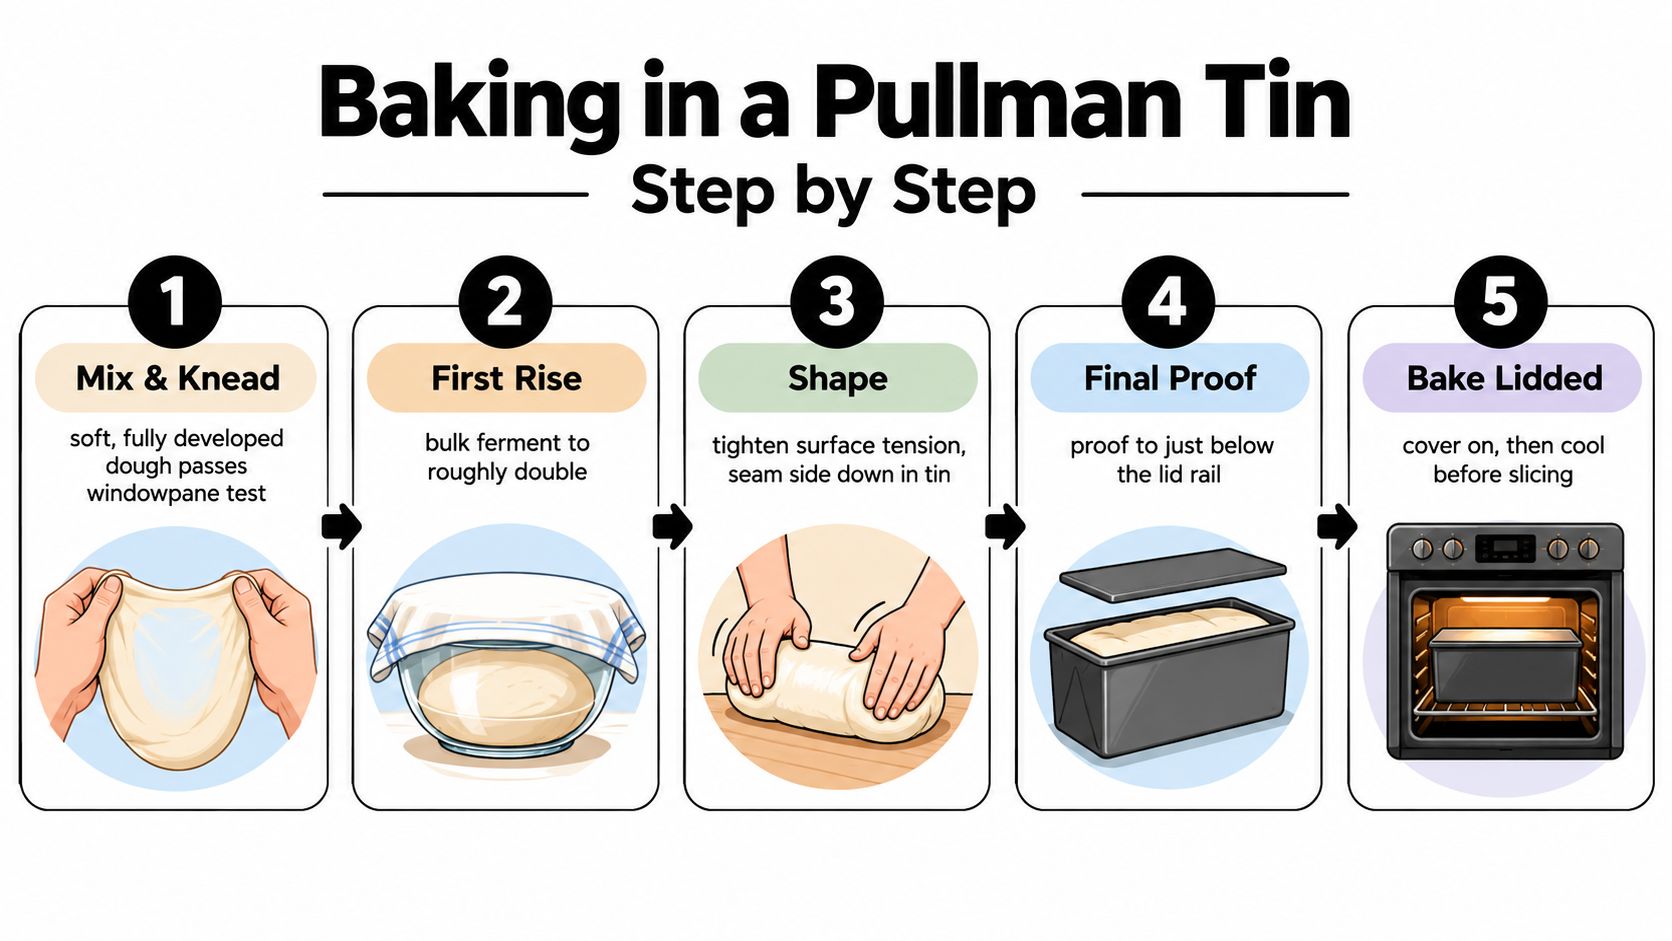
- Develop the dough. Mix until the dough is smooth and elastic, then work it until it can stretch thinly without tearing easily. A soft, fully developed dough handles the pressure from the tin better than an undermixed dough.
- Complete the first rise. Let the dough ferment until it has gained clear volume and feels aerated. Sourdough needs particular attention here because fermentation speed changes with starter strength and kitchen conditions.
- Shape a tight log. Flatten the dough gently, roll it into a firm cylinder and seal the seam. Place the log into the greased tin with the seam underneath, so the smooth surface faces the lid and the walls.
- Proof below the lid. For standard sandwich bread, begin with dough at roughly 40% to 50% of the tin's height and allow it to rise to around 80% full before covering it. For sourdough, a slightly lower final level gives more room for unpredictable oven spring.
- Bake and check the centre. A useful general range for bread tins is 180°C to 220°C for 30 to 45 minutes, as outlined in this UK loaf tin baking guidance. Your recipe and oven still matter, so use the tin's colour, material and dough richness as adjustments rather than treating one setting as universal.
When to use the lid
For a fully square loaf, keep the lid on through the main rise in the oven. If the crust needs more colour, remove the lid near the end and return the tin to the oven briefly. This is particularly useful for enriched dough, which can brown before the centre has finished setting.
Dough development, fermentation and shaping need the same care whether you bake in a Pullman tin or another covered vessel. If you're comparing methods, this guide to Dutch ovens for bread baking explains how a different enclosed environment manages expansion and crust formation.
Let the loaf cool on a wire rack before slicing. A covered tin hides the crumb while it bakes, so a loaf that looks finished on the outside may still need more time to set internally.
Common Mistakes With Pullman Loaf Tins
The most common mistake is treating a lidded tin like an ordinary open pan. The lid doesn't make incorrect dough loading or rushed fermentation disappear. It merely restricts the space available, so errors show up as compressed tops, dense centres or unexpected gaps.
Match the dough to the space
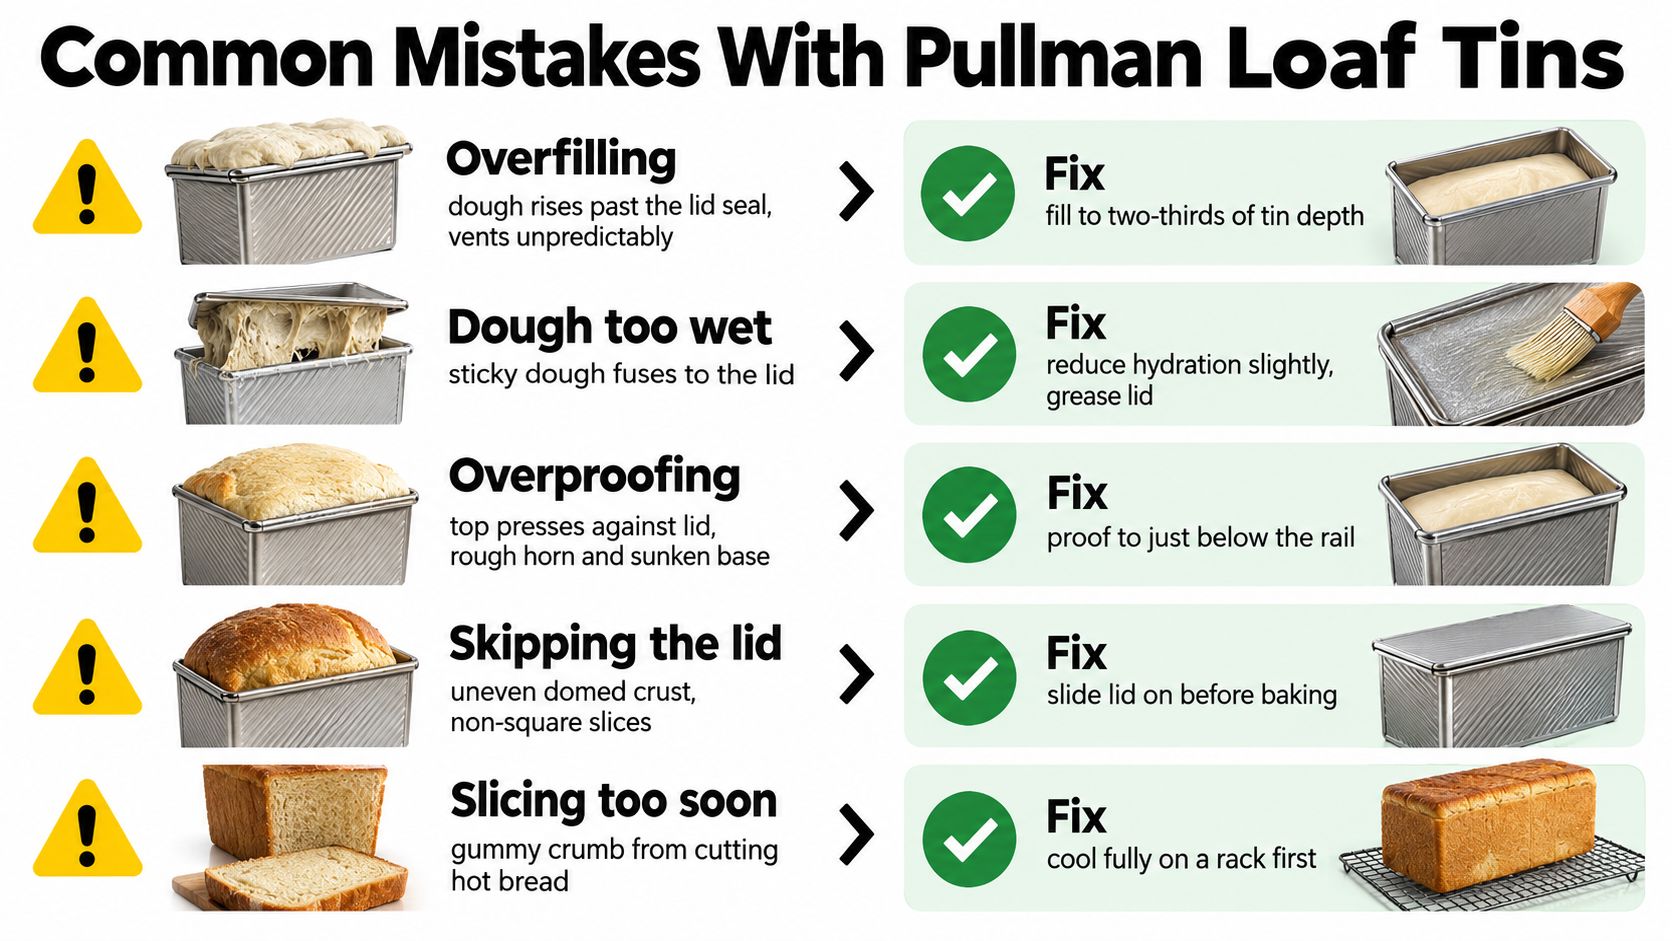
Overfilling leaves the dough nowhere to expand. It may push through the lid edge, vent unevenly and leave a rough ridge rather than a clean square top.
Underfilling creates the opposite problem. The loaf stays short, the lid never guides the top and the crust can become thicker because the dough doesn't occupy the intended cavity.
Overproofing is particularly risky because the lid can press on dough that has already exhausted much of its lifting power. The loaf may look full before baking, yet sink or develop a distorted base once heat exposes its weak structure.
Watch moisture and don't trust colour alone
Very wet dough can struggle in a closed tin because steam has less opportunity to escape. If the dough feels impossible to shape, reduce the water slightly on the next attempt rather than forcing it into the pan and hoping the lid will correct the structure.
Underbaking is also easy to miss. The dark sides of some tins hide the colour of the crumb, so judge doneness by the centre of the loaf and by whether the bread releases cleanly. If the top sticks, check the lid for baked-on dough and grease the contact areas more carefully next time.
Grease the inside corners and the lid rails according to the manufacturer's instructions. Excess grease can collect along seams, while too little release agent can tear the top when you remove the cover.
Finally, don't slice while the loaf is hot. The crumb is still setting, and a sharp knife can compress it into a gummy band even when the bake itself was sound.
Slicing, Storing, and Caring for Your Tin
Let the loaf cool completely on a wire rack before cutting or storing it. The square sides give a serrated bread knife a steady route through the crumb. Use gentle forward strokes instead of pressing down, and keep slices a similar thickness so the centre and heels remain practical for sandwiches and toast.
For short-term storage at room temperature, place the loaf in a cotton bread bag. To freeze it, slice the bread first and separate the pieces. Lay them in a single layer at the start of freezing, then transfer them once firm, so you can remove only the slices needed.
Keep the pan ready for the next loaf
The material and coating affect care, but these habits suit most Pullman tins:
- Wash by hand: Use the dishwasher only when the manufacturer specifically allows it.
- Dry immediately: Carbon steel may develop surface rust if moisture remains.
- Protect bare steel: Re-season uncoated carbon steel when its protective surface starts to weaken.
- Treat the lid gently: Remove baked dough from the rails before it hardens and interferes with sliding.
Drying a carbon-steel tin over low residual heat helps evaporate moisture from corners and seams. Store it uncovered once dry, rather than trapping dampness inside a cupboard or with the lid closed. For coated tins, avoid abrasive pads that can scratch the release surface. A clean, dry Pullman tin will give more predictable release and remain useful for weekday sandwich bread as well as sourdough loaves.
Pullman Loaf Tin Questions Bakers Ask Most
How much dough goes in a 2lb Pullman tin?
UK guidance commonly pairs a 2lb tin with approximately 800g to 900g of dough, but the exact amount depends on the internal cavity and whether you bake with the lid fully closed. Check the seller's internal measurements before scaling a recipe, as external dimensions don't describe the usable baking space.
Should the lid stay on for the whole bake?
Keep it on when you want the flattest top and most controlled corners. Remove it towards the end if the crust needs colour, particularly with enriched dough. The right point depends on the recipe and oven, so avoid opening the lid repeatedly.
Can sourdough work in a Pullman tin?
Yes. Sourdough works well when you shape it firmly, monitor fermentation and avoid filling the tin so high that the lid compresses the dough. Higher-hydration doughs need especially careful handling because the confined space leaves less room for structural weaknesses.
Is a Pullman tin suitable for enriched dough?
It can be, but butter, eggs and milk make dough richer and often slower to bake through. A smaller tin can make it easier to manage the loaf's height and centre, while a removable lid gives you more control over browning and visual checks.
Do millimetre measurements need converting?
No. UK listings commonly publish the pan's dimensions directly in millimetres or centimetres. Compare those measurements with your oven shelf and recipe quantity, then confirm whether the stated size is internal or external.
If you want a dependable starting point for sourdough Pullman baking, The Sourdough Cult offers live active starter, beginner kits, practical tools and clear feeding guidance for UK home bakers. Visit the shop to choose the level of equipment and support that suits your kitchen, then use your new culture in a carefully sized, square sandwich loaf.


